This week, guest blogger Veronica Bishop of Bishop Content Studio is here to show us how to implement a tried and true organizing method in the office called 5S. As a former Professional Organizer and Certified Lean Practitioner, Veronica is a 5S aficionado, and this blog shows exactly how to use this organizing system in your office – or even at home!
Back in my days as a Professional Organizer, I had the very cool opportunity to go through Portland State University’s Certified Lean Practitioner program. It was a wonderful class, led by the talented Tom Fabrizio, Portland Lean Manufacturing expert and author of 5S for the Office.
As you can imagine, I was particularly looking forward to the lesson on office organization, which uses a five-step process called 5S to eliminate waste (think: wasted time looking for things, wasted money replacing tech that is not being properly maintained, etc).
Essentially, 5S is a systematic method for organization. For those who struggle to START an organizing project, methods like this reduce overthinking and allow you to get into a flow state. This method is unique to others because it includes two final steps that allow you to maintain the work and for everyone in the office to get on the same page.
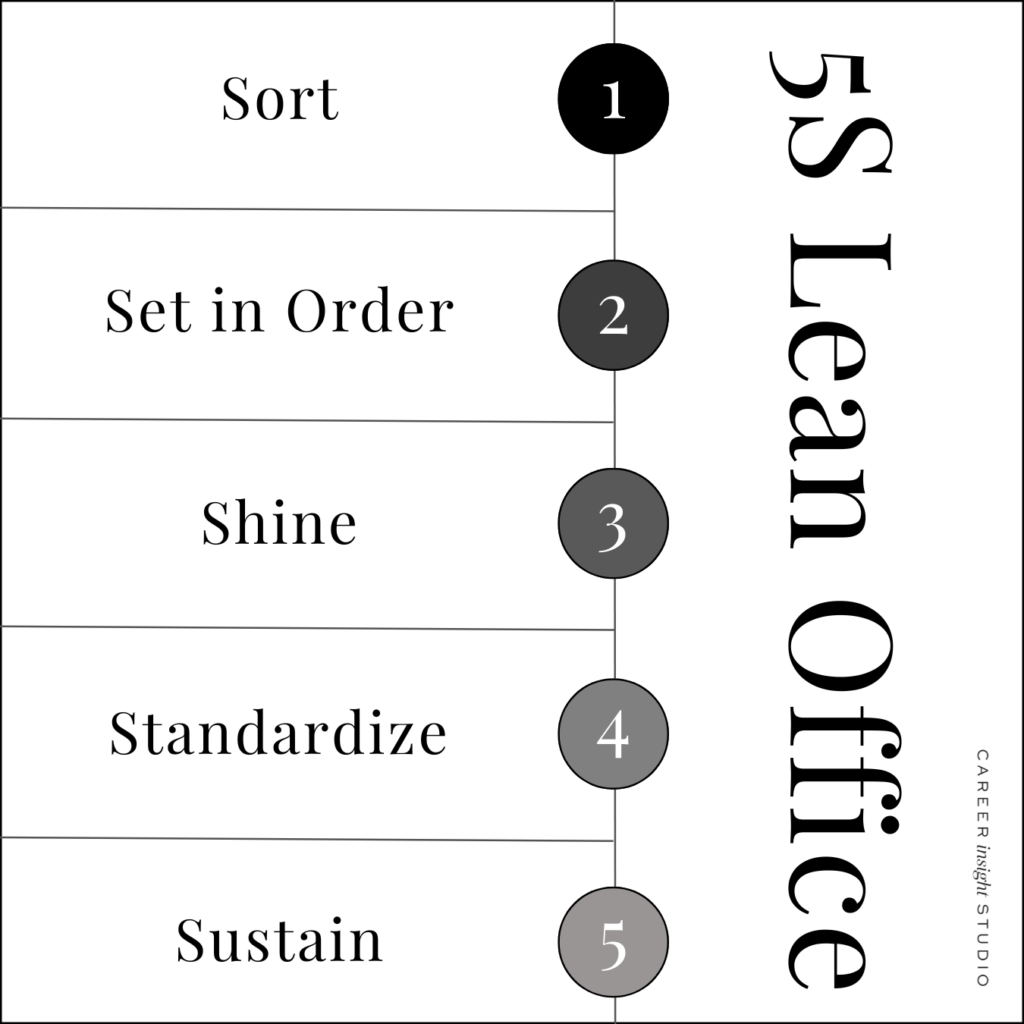 The 5S’s of the Lean Office Are:
Sort
Set in Order
Shine
Standardize
Sustain
After the lesson on 5S, Tom said “careful, it’s easy to take 5S home with you!”
How right he was. I found myself practicing 5S techniques in my kitchen, home office and just about anywhere else that was a communal space requiring good communication to keep tidy. (Whether we’re talking about Sarah in Finance who keeps stealing the only stapler, or your teenage children who can’t seem to remember where the cereal is).
If you plan to set up 5S in the office, it’s important to first get everyone who shares the space on board. If it feels needed/appropriate, appoint someone to be the “champion” of the project. That person will be in charge of discarding items after the work is done and following through on steps 4 and 5.
Let’s get into it!
Step 1: Sort
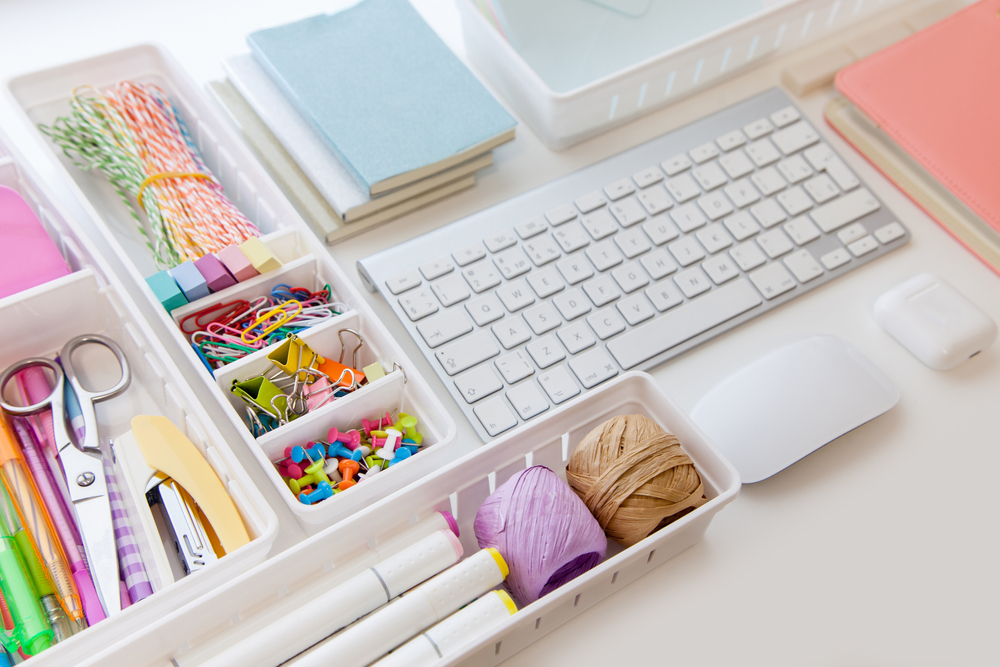
Before you start, ensure you have sufficient space to work. It doesn’t need to be huge, but at least a 5’x 5’ area is recommended. I always liked having a cart on wheels for this part.
Then, gather bins for sorting, sticky notes, a Sharpie, and a few garbage bags for trash and recycling.
Begin with one drawer or cabinet at a time, such as your top desk drawer. Remove everything and place it in the staging area. Then, evaluate each item with the following questions:
- Does this item serve a purpose in this area? If not, does it belong elsewhere? Where?
- How frequently do I use this item? Do I really need it?
- How many of these items are necessary here? (For example, do you really need 4,567 paperclips?)
Group similar items together, dispose of trash in the garbage bag, recycle in a separate bag and shred in another. Place items for donation in one box, and those to go elsewhere in another. Label each of these with a sticky note that corresponds: Trash, Recycle, Shred, Donate, Go Elsewhere.
Proceed to the next drawer or cupboard before returning anything. The goal is to consolidate all office items and be intentional about their placement. If you put things away before completing this process, you can’t make decisions with the full picture in mind.
Step 2: Set in Order
Once you’ve reviewed and sorted each area, it’s time to arrange everything in its final home.
By considering how frequently each item is used, you’ll have a clear idea of where it should be located. For instance, office supplies that you frequently use but were previously inconveniently placed across the room can now be stored in a middle drawer or cupboard near your desk for easy access. Conversely, reference files that you rarely need can be relocated to where the office supplies used to be.
Once you’ve decided on the new locations for items, proceed to step 3 before placing them.
Step 3: Shine
Grab a cloth and spray cleaner, and thoroughly clean every surface. Enjoy the satisfaction of knowing you’ve meticulously cleaned every corner of your office! Be sure to target dust on the front and backs of all electronics, printers, etc. Regularly cleaning out dust increases their lifespan – another great way to prevent waste.
Once finished, place everything in its designated spot.

Step 4: Standardize
This phase of the 5S process involves establishing guidelines to maintain an efficient visual workplace. According to 5S principles, the essence of standardization is encapsulated in the motto: “If you can’t see it, you don’t know it; if you don’t know it, you can’t control it.”
In practical terms, this means implementing visual systems that clearly show where items belong, ensuring ease of access and organization. This could look like:
Visual Controls: Implement visual cues such as labels, color coding, and signage to clearly indicate locations for tools, supplies, and materials. You can even take a photo of the organized inside of a cabinet, then place the image on the outside to show what it should look like.
Checklists: Use checklists to guide daily or periodic tasks, ensuring all steps are completed consistently and correctly.
Standard Operating Procedures (SOPs): Develop and document SOPs for tasks and processes to ensure consistency and efficiency.
If issues arise in the future with maintaining the 5S organization, revisiting and refining this step is crucial to sustain the benefits of your initial efforts.
“If you can’t see it, you don’t know it; if you don’t know it, you can’t control it.”
Step 5: Sustain
The “sustain” step in 5S Lean Manufacturing involves maintaining the cleanliness, organization, and efficiency established during the previous steps. This is the step that REALLY makes a difference and allows the work to be maintained.
This part is boring but true: the Sustain step requires ongoing commitment, regular audits, and continuous improvement efforts! If you go whole hog and 5S the entire office, I strongly recommend that you develop training and education to ensure all employees understand and adhere to 5S organizing principles. This helps to foster a company culture where organizational standards become ingrained habits.
In my experience, companies who successfully integrate 5S into daily operations are able to vastly improve worker productivity, safety, and morale! And that’s the definition of continuous improvement.
Happy organizing!
